Hi Bill,
Congrats on the new purchase - I'm obviously biased, but you've chosen a great boat!
You are quite right that this is a mod done by many 346 owners - searching on this site will throw up threads of how others have done it - most recently by Robert Thornewill:
https://www.moodyowners.info/threads/lines-aft.21107/
In principle, it is a straightforward mod and the coachroof is plenty strong enough. If you're starting from scratch the choice of kit will be a personal preference - but the dimensions will perhaps constrain positioning and number of clutches as well as choice of winch.
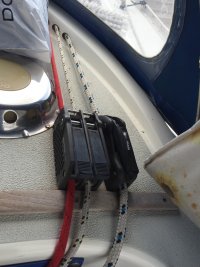
For me, a prev owner had made the mod already but I recently upgraded the clutches as those fitted were too small and did not allow the lines to run freely. The pic shows the original setup (Port side had 4 of same type) and also shows the hole through the coaming which is hollow so no worries about drilling thru it. Other owners have separate holes for each line rather than the big slot I have (which is not finished that well - its on the list of cosmetic tidy-up jobs which always seem to drift...)
View attachment 23166
I went with Spinliock replacements and having lived with the annoyance of too small clutches I upgraded to the XTS model rather than XAS - I just preferred the solid ergonomics of the XTS and the higher load rating. It does restrict the number available so just work out how many you want and measure carefully before deciding - I actually ended up fitting 7 XTS and 1 XAS!
The winches I already had (Lewmar 40ST) were absolutely fine but when I removed the headlining I discovered they'd been fitted without backing plates and old holes from even older winches had not been filled properly to protect to the balsa core and I therefore ended up removing and refitting them too.
View attachment 23167
The pic shows the original arrangement in the heads - a thin scrap piece of aluminium as backing plate on the clutches and none for the winch. There was no sign anywhere of fractures/damage to the grp in the coachroof even with this arrangement which demonstrates the strength of the original build. Your choice of backing plates will be personal preference - I opted for 6mm G10 fixed in place with thickened epoxy. On the port side the heads door frame actually impinges on the ideal clutch location. You could chop some out as Robert did or just work round it. My initial setup with less clutches on the port side was because of this and as I wanted to cover all trace of the original fit with the new ones, I just followed suit and avoided disturbing the heads doorway. The 1st pic shows how the same area looked after my upgrade, and the 2nd is the stb side where there are no space restrictions.
View attachment 23168View attachment 23169
The area is balsa cored so care is needed with drilling and filling holes. I opted for the method of drilling out bolt diameter holes (8mm) and then using a dremel with a router bit to clear out more of the balsa between the skins to create an approx 16mm diameter void. This was all then filled with thickened epoxy before redrilling the bolt holes and bevelling them to improve sealing (I used butyl tape to bed everything). The pics show the finished prep for one of the winches with the old holes also now properly filled with epoxy and the finished install on both sides.
View attachment 23170View attachment 23172View attachment 23171
I used 10mm acetal as a riser block for the clutches to line up with the coaming and give the correct lead angles to the winches and also clear the vents. Once you select hardware you'll need to work out what height of riser you need and the positioning of the winches to get the angles needed.
In terms of costs, as I didn't have to replace winches or deck organisers it was not excessive - clutches were about £500 from Marine Superstore and the ancilliaries - Acetal, G10, bolts, epoxy, sealant etc less than £100. It may not be relevant for you, but our genny winches are the same size - 40STs and one thing I would have considered if I'd needed to buy winches would have been to move the genny winches to the coachroof and bought new bigger genny winches as the 40s are at their limits cranking in the full genny on 14mm sheets. (Or at least I'm at my limit doing the cranking!)
Hope this is of some help and all the best with the new boat!
Peter